Setting Up
On the Extensions Administration page, click into the extension ‘SAML Service Provider’
and set it to active.
There are four main areas that require configuring:
General Settings, Identity Provider, Service Provider, Fields/Attributes Mappings.
General Settings
Storefront

‘Logging Level’ - select from ‘Standard’ or the more verbose ‘Debug’ modes.
‘User Account Creation Allowed’ - if this checkbox is checked,
new user account is created in Storefront when the signing user is approved by the Identity Provider
but such user account does not exist in Storefront.
Usernames are restricted to a maximum of 80 characters.
‘Send Notification To Admins’ - if this checkbox is checked then upon creating a new user account
Storefront sends a notification email to administrative users
about the newly created self-registered user account.
‘User Group For New Accounts’ - select a user group
to which the newly created user account will be added.
‘Redirect From Log In Page To SAML Log In URL’ - this is a legacy compatibility feature,
if this checkbox is checked, the incoming user is redirected to the SAML sign-in process
except for the admin pages, the login pages and the pages for forgotten pasword renewals.
Enabling this feature disables the sign in links on the
log in page.
‘Sign-on Error Redirection URL’ - The user is redirected to this URL
if they are successfully authenticated by the identity provider,
but cannot be signed in for any reason.
If left blank, the user is instead redirected to the login page when failing to sign in.\
Identity Provider
Storefront
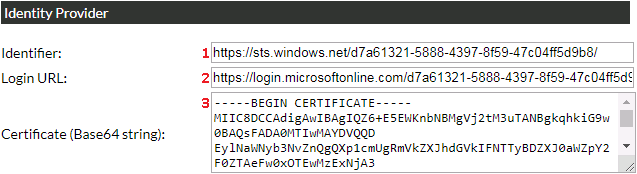
This example uses Microsoft Azure Active Directory as the Identity Provider
but any other SAML 2.0. compatible Identity Provider can be used.
The following settings have to be configured.
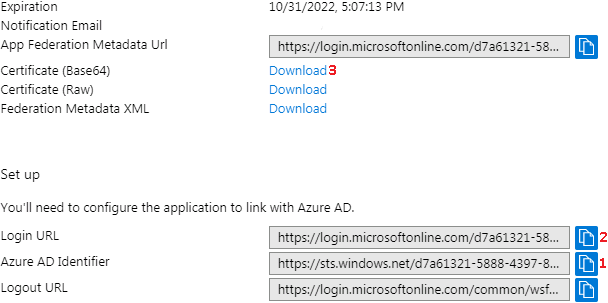
1. ‘Identifier’ - copy the value from the ‘Azure AD Identifier’ field.
This value should uniquely identifies the the Identity Provider to the Service Provider.
2. ‘Login URL’ - copy the value from the ‘Login URL’ field.
This is the URL the integration redirects the user to for authorisation.
3. ‘Certificate’ - click on the ‘Download’ link next to ‘Certificate (Base64)’,
save the file a copy and paste the content.
This certificate is used by the Service Provider to authenticate the Identitiy Provider
Azure AD
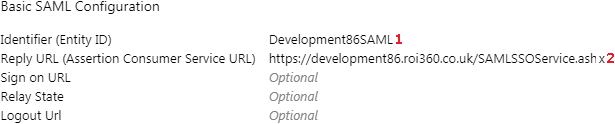
Service Provider
Storefront

1. ‘Identifier’ - copy the value from the ‘Identifier (Entity ID)’ field.
This value should uniquely identify the the Service Provider to the Identity Provider.
2. ‘Assertion Consumer Service URL’ - use the value from this field
and copy it into the ‘Reply URL (Assertion Consumer Service URL)’ field in Azure AD.
By default, this is based on the Default Callback URL in Storefront,
but any site binding can be used as long as it is secure (HTTPS).
Azure AD
Fields/Attributes Mappings
Storefront
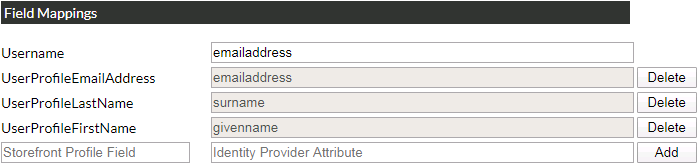
‘Username’ - this is the field that will be used as Storefront login name.
See User Creation for details
on how user accounts are created.
Other fields are optional and if they are provided, their vales will be updated upon successful login attempt.
To map a field, the left-hand value needs to be the unique name of a user profile field in storefront,
while the right-hand value is the claim name in the Identity provider.
Azure AD
